
I shared about our mudroom design over on Instagram and everyone seemed to love it! Ryan wrote up a step-by-step tutorial on everything he did to create this mudroom (along with some rough, in-process photos!). This is truly a one of a kind design as we made this up ourselves! The model home had something sort of similar, but we created our own design which was a huge labor of love. I am so excited to share our mudroom design with storage solutions in case you are looking into making one of your own!

pink rug (similar) // brass pulls // light fixture
When we looked at the model home before buying our home it had a beautiful mud room on the entrance from the garage. Our floor plan would have given us a coat closet, but we opted to have the closet removed so we could design our own mudroom.
We also considered having our builder put the mud room in for us, but their prices were pretty high and I was confident I could build it.

Once we moved in, I realized that the access for the crawl space would have been in the coat closet. That was definitely going to complicate things, but nothing we couldn’t design around. We decided to put in a bench with a hinge so we could still access it and also have a spot to sit.

storage baskets with tops // storage baskets without tops (on top shelves) // pillow // hooks (IKEA but these are similar)
This project was an opportunity for me to learn many new techniques. I had a vision in my head for what the room would look like. It would start with 2 cabinets with a bench between them and then open shelves up each wall and across the top.

The cabinets and their counter would provide a small drop zone on the way in. We'd add some hooks that would allow backpacks and coats to get hung. Open shelves would allow Chelsee to add some decor and storage solutions.


paint colors are Naval and Pure White both by Sherwin Williams // stool is from HomeGoods but this one is similar

These metal baskets have been a game changer in keeping schoolwork clutter off of surfaces. I put our girls schoolwork that has been graded and special project in here. I go through it monthly and recycle items we don't need and keep special items. They always know where their homework is that might be due! Grab them here!

Since the cabinets were the key part of the build, I was going to start there. In my mind, cabinets are just a box and that seemed easy enough. I cut my sides of the cabinets with my track saw. This tool makes it easy to break down full sheets of plywood.

Then, I used a jig saw to cut out the kick plate, and a router to slot out the cabinet bottom. I also built a face frame for the cabinet using 1x2’s. These were cut with my miter saw but could have been cut with a circular saw or table saw.
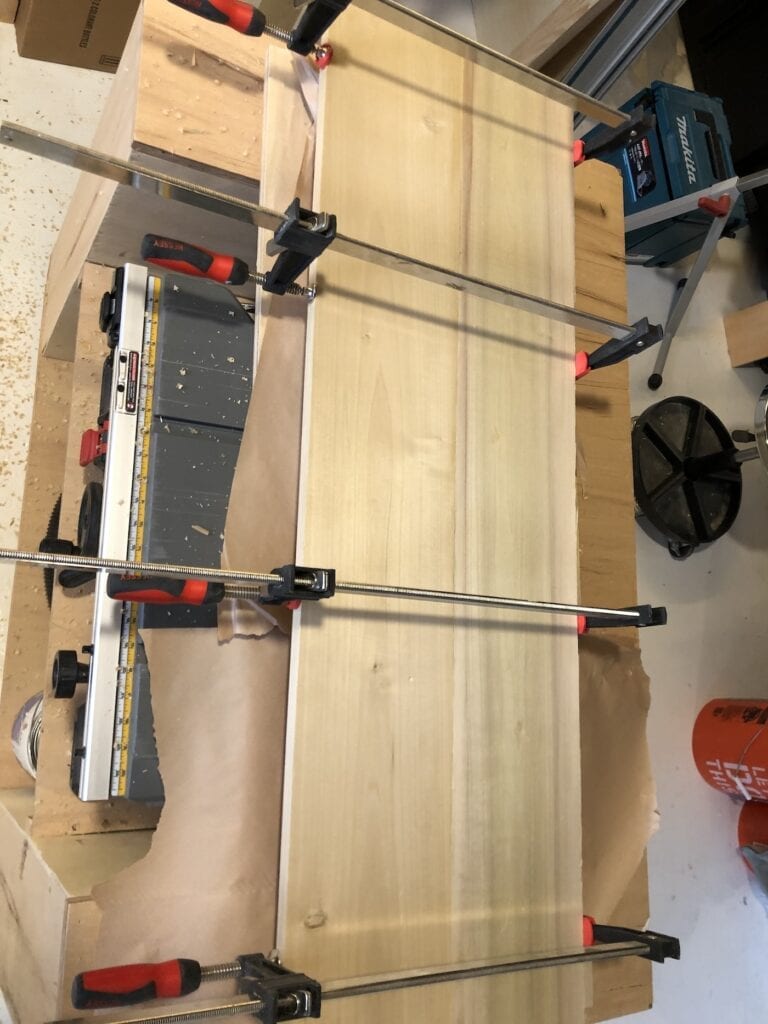
Once the parts are cut, it’s time to glue and clamp. We used SO many clamps. Here is another style in case you're looking. I also picked up some squaring blocks that were helpful in making sure everything was nice and square.

the start of the cabinet front!

this is the front panel of the cabinet - the orange half squares are squaring blocks

so many clamps!

here is one of the cabinets upside down

Then I started making my drawers and my doors. This is where cabinets become worth their cost. Both doors and drawers are a lot of work, with the drawer slides being the most difficult item I had. We used soft close slides and hinges and had to return the first set because they did not work well.

here are the pieces of the drawer

here is one of our drawers after it was assembled

the start of our cabinet door!
I looked at how our other cabinets had been made and attempted to repeat as best as possible. I realized the cabinet doors are 1x2 material with a rabbit cut so that a piece of plywood is slide into. The drawers are made in a similar way. This all would have been much easier with a router table, but was able to be done without. It did require some creative clamping at times.
To get a nice smooth finish on the cabinets, I picked up an airless paint sprayer. This required more paint prep than I’ve done in the past, but the results were worth it. The paint goes on so much smoother.
With the cabinets done, I moved on to the bench. As I indicated, I needed to keep access to the crawl space, so I put a hinge on the bench, so it can swing up and someone can still get below the house.

I didn’t want to put a center support in. The bench is only spanning around 40” and won’t see a lot of use. With support running the length, I’m not worried about any sagging and it supports plenty of weight.
here are the two pieces of the bench getting glued and clamped
Next up was the countertop. Having recently finished our laundry room, I’m getting a little bit of experienced with joining strips of wood together. I did run into some issues with the strips not all being level, as I think I tried to join too many at once. This resulted in more sanding and planing than I really wanted, but the counter looks great. I used 1x2 maple for the counter. Click here for our butcher block countertop tutorial!

With the cabinets, countertop, and bench complete, I needed to build the open shelves above the cabinets. After the cabinets, these were a piece of cake. Just some 3/4” plywood for the sides and the shelves.

I elected to not have adjustable shelves. At the last minute Chelsee decided she wanted the shelf frames to be white, but the shelves to be unfinished wood. Maybe I’m too agreeable, because I started tapping off the shelves so I could keep them an exposed wood. Prepping the shelves turned into a lot of detailed work, but wasn’t terribly difficult.


cabinets are ready for paint!

After the vertical shelves, I was on to the horizontal shelf. Nothing different here. Just more of the same, other than this shelf being an 8’ piece, it was the same as the others. Each open shelf is mounted to the wall and to the piece below it so it’s all nice and sturdy.
Ahhh, it feels good to have the bulk of the work done. Now it’s just a little bit of finish work. Chelsee wanted shiplap above the bench. We’ve done a number of shiplap projects around the house, so I was able to get this done with just some scraps left over from previous projects.

The bench, shelves, and shiplap were all painted before adding them into the room. I thought about painting the cabinets in place, but the prep needed to keep the paint from getting everywhere was too much, so I painted in the garage.
Chelsee selected Naval by Sherwin Williams for the cabinets and we used Pure White by Sherwin Williams (check out our post here discussing our exterior paint featuring Pure White) for the shelves and the shiplap. We stained the counter with a clear polyurethane.
With all the pieces assembled and painted, it was time to put them in the mudroom. The cabinets were easy to drop in, though I did cut the baseboard away so the cabinets fit nicely in with baseboard coming right up to them. This was doing using an oscillating tool.

It was a little painful cutting our brand new baseboards off!

Then, we attached the counters. I secured the vertical shelves to the counter. This pained me a little, but keeps everything nice and secure. Last was to put the horizontal shelf. Unfortunately I measured it perfectly for the space, but didn’t think about the trim around the door to the garage.

This prevented Chelsee and I from being about to put this piece in place. Sadly, I had to cut an entire end off the horizontal shelf and then re-assemble in place. I was convinced I couldn’t fit it, but Chelsee pushed me to give it a try. I guess I just couldn’t bear to think about cutting my hard work, but I got it reassembled in place and I think it looks good.
With everything in place I wanted to add some accent lighting to each shelf. We drilled a hole in the counter to run a cord through, as my outlets were inside my cabinets. I also had to put a small hole in each shelf. We hid the cords in a cable channel. I wanted the lights to be easy to turn on and off, so I connected it to a Lutron Dimmer Outlet and added a switch to the opposite wall.
I also took this as an opportunity to add a home/away light switch. The away switch turns off all the lights, stops any music, shuts off the tv’s in the house, and locks the front door. This is a nice easy way to make sure the house is ready to be unoccupied. We made this happen through the Apple HomeKit as we primarily have Apple TV’s, Airplay speakers, and Lutron Caseta lights that are tied into HomeKit.
Chelsee did the final touches with the decorating. I think it looks fantastic.
Ok, now that the design tutorial is over I will share our decor and storage solutions! I purchased all of our storage baskets at The Container Store. They had the best deal on natural hyacinth baskets. They're beautiful and functional. The middle shelf baskets have tops and the top baskets don't. I still have to fill these with items I want to store. Imagine all the storage possibilities here!
One of our drawers is a charging station. Ryan routed cables into the plug in on the wall. This is such a nice touch. We charge our phones, iPads, watches, etc.
Black Shiplap Accent Wall // Laundry Room Update // Board and Batten DIY Tutorial

I hope this post helped in your search for the perfect mudroom design for your home! Please let me know if you have any questions by leaving a comment below. Or, feel free to DM me on Instagram. Thanks so much for reading!

Nice post so far. Thanks for sharing your amazing blog.