
We've had our open bookcases in our office for over a year now and it was definitely a process to style them. I kept going back and forth, moving things around constantly, and after a few weeks I finally had them how I wanted them! Styling built in shelves can be quite the process, but I love the look of them.

We have open shelving in our bathroom, our playroom and of course in our office. I'd love to share my process in styling our shelves! Keep reading for built in shelf styling ideas you can implement today!
It can be overwhelming at first when you're looking at your open shelving trying to decide where to start. Do you need to take a trip to the store to grab a few new items or do you have enough decor around your home already?

My go to spots for finding great decor for your open shelving is Home Goods, TJMaxx, Target, Hobby Lobby, Crate and Barrel, and Amazon. Another great place to look is thrift stores and Goodwill. You can find some great vases and books.

You can always up-cycle a thrifted vase by spray painting it! I love getting coffee table books from thrift stores and turning the cover around so it's white or styling the book so the pages are facing out.


@thehouseofhoodblog #athomepartner Save this for your next home refresh! Styling open shelves doesn’t have to be overwhelming! We just finished our fireplace and wanted to bring our new open shelving to life, so I headed to @At Home to find a few key pieces and it completely transformed our space. I’m sharing exactly how I styled these shelves step-by-step, using simple, affordable décor to create an elevated look. From anchoring with larger pieces to layering textures and editing things down, these are the exact styling tricks I always use to make shelves feel balanced (not cluttered). At Home is my go-to for all things home decor but they especially have the best finds for styling shelves. It really is a one stop shop! If you’ve been searching for how to style open shelves, this is such an easy method you can recreate in your own home. Need a link? https://shopmy.us/shop/collections/4815132 #athomefinds #shelfstyling #shelfiedecor #shelfdecor
I always find great riser options for open shelving or coffee tables/side tables from Hobby Lobby

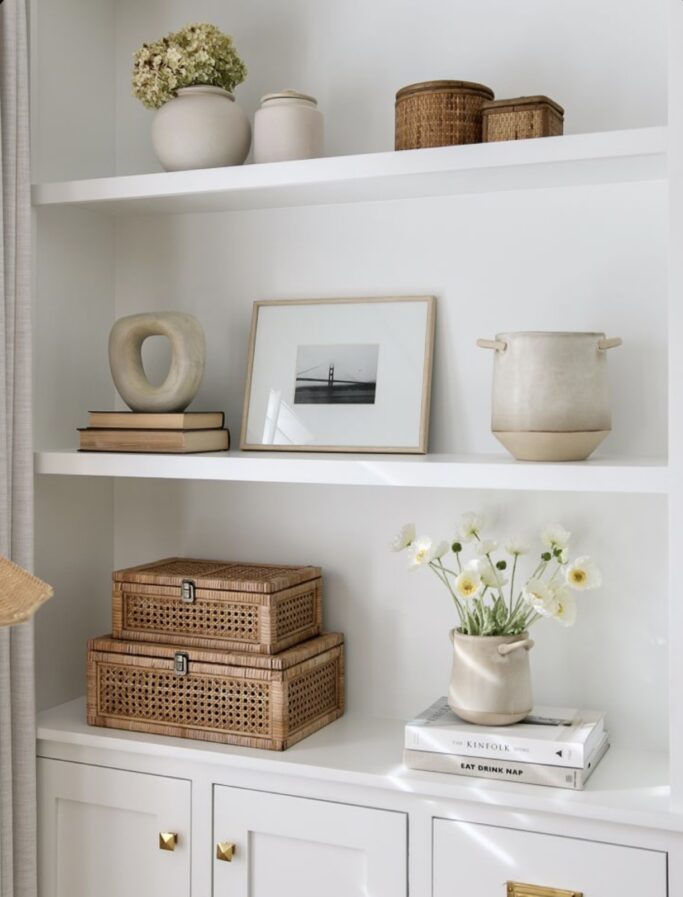
image via The Cumberland Project
Click any image below to shop our favorite open shelving decor!

Ok, our first step to styling our open shelving is to take everything off your shelves if they already have decor on them. I like to grab a folding table to set everything on so it's a clean slate. Do you have decor that's not in use around your home? Grab that too and set it on your folding table.

I like a more minimalist vibe, so I like to use 3-5 items per shelf (if the shelf is really long, that number can go up). Shelf styling can take some time, so don't rush the process.
I like to have meaningful items on my shelves, so if you don't have the perfect object for that particular shelf it's ok! Leave a blank spot and I'm sure you'll come across something perfect for that space.


shop everything in this image here
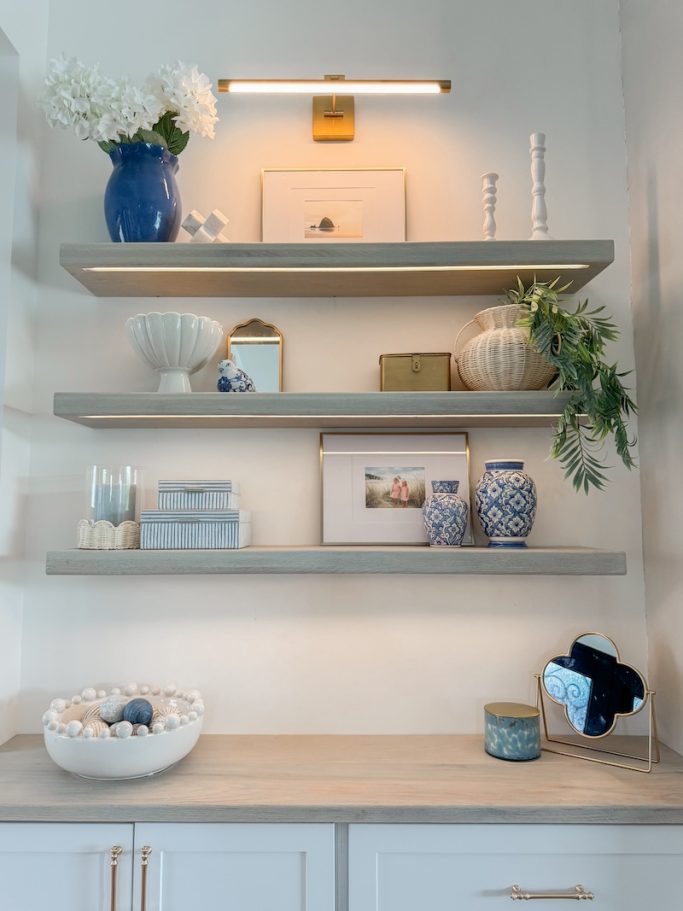
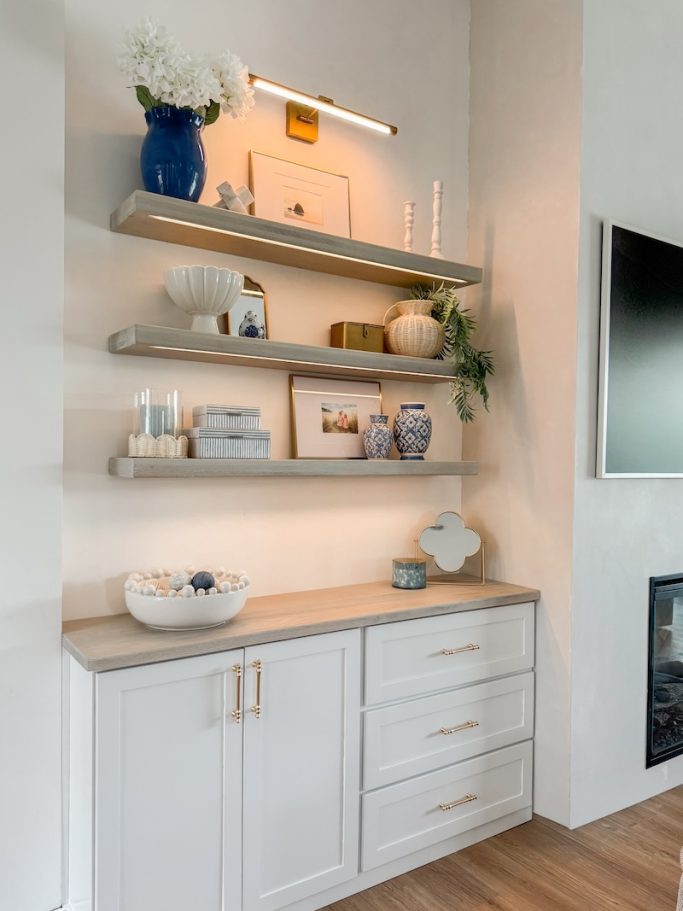
The next step to styling your shelves is choosing a color scheme or theme. Do you have a certain color in your space? We have sage green in our living room, so I would add some sage green accents to our open shelves. Do you have a more coastal vibe in your home? Add in some beachy decor like framed pictures of your favorite beach, blue tones, or some driftwood.


Our shelves are styled with more neutral colors. I chose white, black, natural wood, and some pops of brass. I added in some rattan for texture.

Next up, we'll start grouping items together. You'll take your vases, frames, books, links, orbs, arches, risers (we'll talk about those in a bit), large/medium/small objects, and greenery and separate them into groups. As a helpful hint, I try really hard to stay away from too many small items. It creates unnecessary clutter.

Once you have your groupings, decide on if you're missing something. Do you have 10 vases, but only one book? Or do you have 20 large objects but only a few medium sized objects?


shop shelf decor here
Now is a great time to 'shop your home' to see if you can borrow from other rooms in your home to fill your shelves.

Image Via Cameron Garret Designs

Our first step is to create anchors. These will be our largest items and objects. For our office built-ins, I decided to use 'anchors' on the top shelves. You'll want your anchors to be the same items such as large vases, large bowls, or baskets.

For this example, I used baskets. This also helps to keep your shelves cleaner and less cluttered. Plus, it's a great spot to store seasonal items!

a cutting board is a great option for a leaner if you're styling kitchen shelves!

I also love to style my shelves with leaning items. This would be framed art work or framed photos. I don't use these in/on every shelf, but it's a great way to create an anchor.

image via The Subry Group Design


With your large items, I like to set them on the outermost side of your shelves. If you stick with one large item (like stacked boxes) you can place these in the middle of your shelves. If you don't have enough large pieces, you can always group a few small pieces together!

Now that we have our large items and anchors in place, we'll start to layer in medium and small items and objects. Pull some groupings out towards the front and keep some groupings toward the back. This gives your shelves depth.


Groupings of odd numbers are the most pleasing to the eye, but sometimes this doesn't always work. With your largest items in place, add in your medium and small items next to them.

Try to repeat groupings. For example, if you're styling with books repeat them in other areas of your shelves. If you're using vases, repeat those in more areas than just one. If you're using greenery, be sure to repeat that throughout. Add in texture with things like pampas grass, feathers, or rattan.

Another favorite item to style shelves with are 'risers'. I find wooden rounds with legs, plant holders or even small cake plates to create height and depth on my shelves. Hobby Lobby always has great riser options! I also like these from Target.

Our last step is to step back and evaluate the situation. Do we need to add or subtract anything? Do our shelves feel balanced? It's ok to spend quite a while on your open shelving. It can be quite the process!

I will sometimes call on a second set of eyes after I've been looking at my shelves for too long. It helps to have a fresh set of eyes on your work!

Do your shelves feel complete? Now you can sit back and enjoy your newly styled shelves! If you find pieces you want to add to your shelves, it's totally ok to do so! Just take away a similar item and plug your new piece in. You can pop the old item into a basket for later!

image via Studio KP Interior Design
Powder Bathroom Makeover // Board and Batten DIY // Living Room Decor Ideas
Hopefully this post gave you some ideas and a plan to give you confidence in styling your own open shelving! Please let me know if you have any questions by leaving a comment below, or feel free to DM me on Instagram!

Pin this for later!
